There are two days left until voting opens in our November Caning Challenge! Until then, we'd like to whet your appetite with a beautiful treasury It's all in the details treasury created by Lisa of HiGirls showcasing items made using this fabulous technique.

Sunday, October 30, 2011
Saturday, October 22, 2011
The emotional thrill of polymer clay caning (part 2)
This post is the second-half of a two-part series by PCAGOE member Jackie Sieben of The Pleasant Pheasant. Jackie offers her insights on caning just in time for our November caning challenge. Read Part 1.
Part 2 of a 2-part series: The emotional thrill of polymer clay caning

(I highly recommend pages 18 and 19 of Kim Cavender’s book, “Polymer Clay For the Fun Of It” for excellent instructions for stripes and jelly rolls.)
Part 2 of a 2-part series: The emotional thrill of polymer clay caning

Avoiding Frustration
Mostly it’s the smallest things that make the difference in
the frustration levels, so listen carefully. You cannot be heavy-handed when
you want perfect canes. You have to treat the clay GENTLY during most processes,
and that was where I failed early on. I was smashing, pushing, pulling,
squishing, beating…. And my canes showed the bruises!
Now this word GENTLY is going to be overused in this
missive, but I want to be sure you can make some commonly-used canes and do
them well, so I have to repeat myself often at various stages. Okay, so if
you’re good with that, we can go on to where I recommend newer caners begin,
Skinner blend rolls, Jelly rolls, Stripes and Checkerboards. Very importantly…
once you can make these canes look good every time, you’ll be on your way to
bigger and better detailed canes.
Skinner blend roll
– Make a flat Skinner blend, ending on a medium thickness on your pasta
machine. Here’s a tip, once you have the finished blend lying on your work
surface, run your blade down the center length, from the dark color to the
light color. Now put these through your pasta machine from light to dark again
on a medium thin setting. The strips will get quite long. You can roll one of
the pieces from the light to the dark, and the other from the dark to the
light.

Gently! Slowly… making sure air is not being trapped between the layers as you roll, especially at the beginning when you roll that first tiny little bit of clay in. When finished rolling, rub the seam down gently to flatten it into the roll, set the roll on your table and give it a few rolls back and forth without changing the original size of the roll. Now let these two rolls sit. No no no – do NOT slice into them yet! They need to rest for about an hour while you move on to making a…

Gently! Slowly… making sure air is not being trapped between the layers as you roll, especially at the beginning when you roll that first tiny little bit of clay in. When finished rolling, rub the seam down gently to flatten it into the roll, set the roll on your table and give it a few rolls back and forth without changing the original size of the roll. Now let these two rolls sit. No no no – do NOT slice into them yet! They need to rest for about an hour while you move on to making a…
Jelly roll
– Take two conditioned sheets of clay of contrasting colors rolled out on the
thickest setting of your pasta machine. Not too big, about 5” wide by 3” tall.
Lay a piece of deli paper on your work surface, put the first sheet down, then
set the second sheet on top – by starting at one end and gently moving your
other hand along the sheet to avoid introducing air bubbles.

Once down, gently roll them together with a brayer. Don’t smash!! You want each sheet to remain at the thickness they came from the pasta machine, but stuck together now. As an aside, if you do see air pockets, slice into them with your blade and gently remove the air without leaving dents in the clay.

Once down, gently roll them together with a brayer. Don’t smash!! You want each sheet to remain at the thickness they came from the pasta machine, but stuck together now. As an aside, if you do see air pockets, slice into them with your blade and gently remove the air without leaving dents in the clay.
To make these two sheets into a jelly roll, trim the two
ends, and measure the center. Fold at the center line avoiding air bubbles,
press that fold down so it is stuck with no space left, and brayer together
again.
** Start rolling at the center fold, slowly, carefully, and roll to the end. Slit any air pockets with your blade, press out the air without leaving dents, and let the jelly roll sit for 1 hour before trimming ends and reducing.
** Start rolling at the center fold, slowly, carefully, and roll to the end. Slit any air pockets with your blade, press out the air without leaving dents, and let the jelly roll sit for 1 hour before trimming ends and reducing.
** (You can also do Jelly rolls by rolling from one end
rather than doing the center folding and rolling step.)
** In both cases, before you begin rolling, you’ll want to
slightly brayer the end where you plan to start rolling to slant it a bit. This
will make the center of your Jelly roll neater. This is one of those “be
careful not to press it down too hard” steps. You need both layers to stay near
the same thickness throughout the entire length of the roll.)
Stripes – some
people tend to have trouble with striped canes but I’ve learned that working
slowly and carefully does the trick, and so if you work that way, too, you’ll
be successful in making striped canes. Take two sheets of contrasting clay
colors, thickest pasta machine setting, about 4.5” wide by 2.5 inches tall.
Place first sheet on your work surface, and second sheet on top as for the
Jelly roll and brayer together gently. Cut into 3 equal pieces, each 1.5 inches
wide.

Set the left side piece on to the center piece and brayer gently to remove air, and do the same to the right side piece. Allow a few minutes resting time, then put the stack on your work surface and press it down to stick. You will be cutting the LONG length.


Set the left side piece on to the center piece and brayer gently to remove air, and do the same to the right side piece. Allow a few minutes resting time, then put the stack on your work surface and press it down to stick. You will be cutting the LONG length.

With your eyes directly over the stack,
hold your tissue blade tightly at each end and pull the blade apart with your
hands as you slice down through the stack. Don’t remove the slices as you go,
just keep slicing. Do it SLOWLY and always pull on the two ends of the blade as
you do. You can measure or use a tool to show where you want to cut before slicing
if you want to. A hair comb, a Kato Marxit tool or even a tomato holder tool
work for this marking.

Now gently take each slice and lay them on deli paper,
setting them close together, making sure your stripes are
light-dark-light-dark, etc. Put a plastic deli sheet over the top (the material
that sliced meat is wrapped in from the delicatessen) and rub the seams with
your finger going ONLY in the direction of the stripes, to stick the pieces
together.

Take the top deli sheet off and brayer (gently, of course!) Do NOT try to lift the clay from the bottom piece of paper, instead turn it over on your work surface and remove the paper from the clay without bending the clay. Trim the bottom edge of your stripes and you have a striped sheet all ready to use in your work.

Take the top deli sheet off and brayer (gently, of course!) Do NOT try to lift the clay from the bottom piece of paper, instead turn it over on your work surface and remove the paper from the clay without bending the clay. Trim the bottom edge of your stripes and you have a striped sheet all ready to use in your work.
(I highly recommend pages 18 and 19 of Kim Cavender’s book, “Polymer Clay For the Fun Of It” for excellent instructions for stripes and jelly rolls.)
Checkerboard
– Start with the same size clay as for stripes, but cut those first two
contrasting layers into FOUR equal sections.

Stack each section as you did for stripes, and trim all four sides. (You will have to trim more for the checkerboard than you did for stripes once you have a stack, to start with clean edges all around the stack.) This time when you stick the stack to your work surface, you will be cutting the SHORT edge of the stack.

Make your equal cuts without removing the slices yet. Now take each slice, one by one, and flip them back and forth to match them with the previous slice into a checkerboard pattern. VERY important that you check both the top of the stack and then the bottom of the stack for each slice, to be sure the opposite colors are lining up neatly.

Gently press together and let the stack rest for at least an
hour before slicing to use in your work.
VOILA!! With a little practice, these canes will become
second nature to you and you’ll be on your way to more elaborate cane-making
before you know it.
Read Part 1.
Read Part 1.
Wednesday, October 19, 2011
The emotional thrill of polmer clay caning
This post is part one of a two-parter by PCAGOE member Jackie Sieben of The Pleasant Pheasant. Jackie offers her insights on caning just in time for our November caning challenge. Read Part 2.
Part 1 of a 2-part series: The emotional thrill of polymer clay caning


The clay matters
Part 2 of this series will give you some tips for creating classic cane patterns.
Part 1 of a 2-part series: The emotional thrill of polymer clay caning
Now if you have had nothing but frustration and squished
canes when you’ve tried to make polymer clay canes, you’ll think a crazy person
wrote that title. But, although “perfectly normal” is not always included in a
description of me, I’m not crazy, honest!
These days, I love making polymer clay canes. But it was not
always so. I spent a small fortune for years buying beautiful canes from other
clayers to use in my work. Behind the scenes, with many disturbing failures
along that road, I tried to make my own canes. Eventually, it all came together
for me. However, I recall my frustrations then clearly and I care very much
about your frustrations now. It’s awful!
If you’re not currently a “caner” and find the process
wrought with frustration, what can you do to make your caning results better
and actually enjoyable? How can you find that emotional thrill at the end of
every cane making session that sends you back to making more and better canes?
I’ll try to share some of my most important tips and tricks
here, along with instructions for some basic canes. These are the things that
work for me and not necessarily the way everybody does it.
There is always some “waste” involved in polymer clay cane
making. However, “waste not, want not” is our motto, so save those cane ends
and extra bits! They can be used in other projects.

The clay matters
For now, we need to talk about the choice of brand of clay
for caning. I’ll keep this as short as I can, however, with the clay companies
constantly changing our medium, pulling and adding colors, and changing the
viscosity of our clay, it is a big and important subject that deserves your
attention.
For the purpose of this article, I’ll try not to go into too many
details. Suffice to say that, in my opinion, you shouldn’t even try to make
canes with some of the clay available. They have their place, but not in the
caning process. Those are Studio by Sculpey, Sculpey III, and Fimo Soft. Some
people can do it… but I can’t so I refer you away from those. A lot of people
use Premo… again, while you can get some results, they aren’t going to be the
best when you’re looking for crisp patterns. My recommendations are Kato Clay,
Pardo Art Clay (not Pardo Jewellry Clay) and Fimo Classic.
I use Kato clay most
of the time. The problem lately is that Kato has changed their formula and the
clay is far softer than it ever was. However, I have experimented a little and
the new Kato still holds a pattern quite well. If you buy new packages, you’ll
need to let them sit for a couple of months to harden up a bit. Don’t leach…
just leave it sitting in the package. The drawback to Kato clay for me is their
color palette, which means that I can spend days just mixing colors (and not an
easy process with the choices given).
However, Kato clay stays true to color
when it’s baked, which Fimo Classic does not. Although I like the way Fimo
Classic handles and I love their colors, the baking color change makes it not a
viable choice for me. I have only experimented a little bit with the Pardo Art
Clay, but it works great for patterns. It’s quite difficult to condition and
I’ve had to mix other clay into it just to get it conditioned, so at this time
Kato works best for me.
Part 2 of this series will give you some tips for creating classic cane patterns.
Sunday, October 16, 2011
Marvelous Canes
Linda of NK Designs created this treasury, Marvelous Canes of Polymer from a collection of items hand-crafted by our members.
Canes are the mainstay of many polymer artists. Here are just some gorgeous examples. You'll see more caning when we unveil the entries for the November challenge. Stop back on Nov. 1 to vote.
Wednesday, October 12, 2011
Free Flower Cane Tutorial

Tutorial: Basic Flower Cane
by Linda Riopel of NKDesigns
Here’s a little tutorial to help you get started in cane making of a flower. This is a very basic cane. One of the most enjoyable aspects of making canes is the versatility the artist has in color choices, number of petals, number of veins and the center of the flower. Have fun!
Materials:
Skinner blend (white plus your choice of flower petal color) rolled into a plug.
½ block of translucent clay (Premo or Kato)
¼ block of contrasting color clay for the veins and to wrap the Skinner blend plug.
Tools:
• Tissue blade knife
• Heart Shaped (or your desired shape) cutter
• Pasta machine
Step 1: Cut three veins into the Skinner blend plug for the veins. Here I used turquoise and white Skinner blend and added turquoise veins. I wrapped the Skinner blend plug with a darker turquoise very thin layer (the thinnest setting on your pasta machine.)

Step 2: Reduce this plug by gently squeezing the center into a “dog bone” shape and gently elongating the cane to approximately 7 to 8 inches. Do not roll the cane. Cut this long cane into six pieces. Trim off the ends.
Step 3: Decide what you would like for the center of the flower. Here I used a black center and placed some white lace canes around it. You can just use a bullseye cane or if you prefer, just a snake.

Step 4: Gently shape the six pieces into a petal shape with the veins at the bottom and place around the center of the flower.

Step 5: Make a long thin snake of the translucent and place in between the petals.
Step 6: On the thinnest setting of your pasta machine, make a thin strip of translucent and wrap the entire cane.
Step 7: Reduce this cane (dog bone shape – just squeezing the center of the cane) and then elongating it until you have about six inches. Do not roll this cane.

Step 8: Cut this long cane in half and reduce again, giving you different size flowers.
Here you will see how I placed the flowers along one side of a flat heart. I’ve added leaves and white flowers. If you wish to copy this background, there is a tutorial on how this is done.
I hope you enjoyed this tutorial.
Copyrights 2009 Linda Riopel
Monday, October 10, 2011
The Challenge of Caning
Our next challenge, caning, is generating a lot of buzz on our members' discussion forum. It is great to see seasoned caning pros helping the novices get ready for the challenge. That spirit of community is at the heart of PCAGOE membership.
Here is a sneak peek at some of the conversation. This advice is from member Linda from NKDesigns. Stop back on Wednesday to see a free flower cane tutorial by Linda.
So what exactly is a cane? The Three Ps!
A cane is a log or cylinder of clay that has a design running through it, so each slice of the cane contains the design. When trying to describe what exactly a cane is to a novice clayer, those holiday cookies come to mind - the slice and bake cookies from the grocer’s freezer. Caning with polymer clay is an art form in and of itself. Manipulating different colors, shapes and sizes of clay to form geometric, landscapes, faces, quilt patterns and flowers (and many more subjects) is what caning is all about. Caning is a technique originally used in glassmaking and adapted to our medium of polymer clay.There are three main brands of clay used for caning in the United States, Kato, Premo, Fimo, and Sculpey. Each brand has different properties; Kato being the choice for many caners. Other people prefer Premo, Fimo, and Sculpey or a combination of the clays.
The cane can be round, square, triangular, or any other regular shape. There are complicated canes such as kaleidoscope and more simple types such as a bullseye cane. Making a cane usually begins with a Skinner blend. The clay is then manipulated into a design, cut into pieces and reassembled. For example, petals of a flower around a center stem.
To make a cane, you combine sheets and long snakes of clay in a pattern that will be revealed when you slice the cane. You can use any combination of colors and patterns; you can even use small canes as part of your design, combining them into larger canes.
Once a cane is created, the next step is to reduce or lengthen the cane to make the design different sizes. This is accomplished by squeezing the middle of the cane in a type of “dog bone” shape and gently extending both sides of the cane to the needed sizes. Most canes are never rolled since the design inside the cane has a tendency to distort. Resting the reduced cane for several hours or even days helps with slicing. Thin slices, using a tissue blade (the kind a pathologist might use) are taken from the cane and applied onto a base – be it a pendant, bead, structure, etc. The edges of the slice are then smoothed down and it’s ready to be fired.
Canes should be wrapped with waxed paper or plastic wrap for storage. They should be kept clean and dry for maximum usage.
Making a cane can be intimidating for a new clayer, but with practice, patience and persistence, it is one of the most rewarding aspects of our medium.
Sunday, October 9, 2011
October Challenge Winners
And the winners of the October "Masks" challenge are:
1st Place:
2nd Place:
3rd Place:
2nd Place:
3rd Place:
The voters who won prizes this month:
Rosa Parks
Sandy Prenzi
Jennifer Smith
Winning voters have one week after being contacted to furnish us with your mailing address. If you do not respond within 1 week, your prize will be forfeited and returned to the prize pool.
Congratulations to all the winners, and thank you to everyone who voted and supports our challenges each month.
193 votes were cast this month.
Comments left by the voters:
A great idea and a great challenge! I love working in polymer but doing faces well takes a lot of skill!
These are so creative. I love how each artist interpreted the theme in a unique way.
A difficult challenge this month. Members can through with flying colors. Very nice.
Very creative stuff - as always. Such talent here in this group!
This was truly a challenge for this artist but I love how it got me to experiment with shapes and dimensions I normally avoid. Everyone did a great job and there are surely seven winners this month!
Adorable masks! Great job by amazing artists.
Even with just seven entries, the choices are still difficult. I went with entries that stretched the boundaries of traditional masks.
Cool masks! I have to say that for me, the Dragonfly Mask takes the cake for being really well done and great looking, but I sure liked the others as a very close second to that one. Good going, everyone.
These are all beautiful works of art . Thanks for sharing
This was a hard decision this month. All the masks are works of art and are all beautiful.
Great variety in the entries this month.
This challenge was particularly difficult for me to vote on as (A) I LOVE masks; and (B) I felt every single one was excellent.
Brava!!!
I love the use of colors and the personal touch in these masks. They are all so nice!
So bummed that I couldn't find time to do this challenge... this was one I was really looking forward to doing, but alas, I haven't even touched a piece of polymer clay in months. :( I really need to get back to creating. Job well done by all who entered. The dragonfly mask is my #1 pick, just beautifully executed...
You guys all did so well! Beautiful work.
A wonderful challenge and awesome entries.
Loved 'em all. Hard to choose.
#7 rocks. Full fledged mask. A lot of professional work went into this one!
All entrees are so different and colorful which made this a difficult decision. I applaud all for their creativity!
Great idea! Love the entries!
Beautiful Masks!
I saw a link to this in a post from Jackie Seiban. These are all amazing masks! I belong to the Polymer Clay Smooshers guild on ArtFire and unfortunately we weren't able to do our Masquerade Ball Challenge this year. You've got some very talented artists here!
-Michelle of CreativeCritters
Love them all....makes it so difficult to choose!
I was impressed by the use of color and rhythm in some of the interpretations this month. Masks aren't easy--I have tried to make them myself and was not completely satisfied with the results, so I appreciate even more the beautiful and striking results in this month's challenge pieces.
Your members are so talented that it is hard to choose!
all the work is lovely and shows off the range of talent in the guild.
I love voting for these monthly
contests! There are so many
talented artists.....
Thanks, Cindi
Your pages continue to inspire me.
Great entries, hard to choose...Always enjoy!
It was hard to make a choice because they are all excellent. I chose the ones that were more "me".
I love seeing the entries every month. All the artists are so original
I love all of them and it was so hard to choose! Can I just pick all 7?!! :)
Being from Mississippi, Mardi Gras is right around the corner. I love these! Great job everyone!
Theresa
I love polymer clay masks, am in Sarajane Halems mask book myslef and oftenmake some - what better medium than PC to express strong feelings like those a mask can represent?
Awesome masks, mostly loved the first one, so vivid
The wakeup Mask is beautiful and I love the symbology.
The thumbnail of #7 was not impressive - enlarged the exquisite detail easily makes it #1.
Nice work everyone!
These are all wonderful! As always,
very hard to choose.
These are fun!
Everyone did so well that as always it was hard to pick. Good luck to everyone.
All the masks are so pretty, it was difficult to chose one. Thanks for letting us help choose.
Just found you and love the site
All the entries are amazing and inspirational.
Love the textures & colors that work so well together
I love the dragon fly on the mask.
I'm sad I missed this one, MOVING takes so much out of you.....
I'm just starting off learning polymer clay and these wonderful works of art are great inspriation for where this new passion might take me. thank you
I think these mask are realy lovely and a piece of art
goodness, so hard to pick,they are so different and original---wonderful work each and evey one-sherry
Just beautiful and I really liked the assortment. Wonderful job to all. Eileen
Such lovely work hard to pick my favorites. Always such enjoyable eye candy displayed at these challenges.
I truly love the crackle finish on the showgirl mask and the braided headband. I like the simplicity of this compared to the more ornate ones.
I am just getting started in poly-clay.
All of these beautiful works inspire me.
Thank you so much for sharing!
In a word....Thanks...Thanks for being here.
Love the colors of the beads on the Mexican mask!
What a lovely group with wonderful goal where polymer clay is so beautifully celebrated through each post.
number 1 is stunning, love the colours and work that must have went into it ! Lovely
All beautiful masks!! What a difficult challenge! The colors of The Mexican Mask are really popping:)
I have not yet joined the PCAGOE but it's on my list ! I love the newsletter I am also a polymer clay artist and it's so much fun to see what other artist's are creating ! I am happy to be able to vote it was fun and inspirational ! Thank You and Good Luck to all the artist's who had entries!
I really love the originality of "Wake Up"!
love the dingly danglies on the wake up mask...looks just like me when I get out of bed!
I simply love the whole contest and how creative people joins to do their very best and show their talent!
Interesting challenge. Loved to see the different styles of work. Particularly liked the color palate used in dragonfly mask as I have always been fasinated by the fancy masks of this type.
All the entries were extremly unique and intricate. It was difficult to judge - the more I looked at the entries, the more I saw to draw my eye towards each one.
Lisa's entry just made me smile and the detail work is exceptional. Well done.
I am glad you gave use the 1-2-3 choice I was having a hard time just picking one.
I thought all entries were quite original; but I could see that a lot of different kinds of work went into the Dragonfly Mask; and it turned out to be gorgeous.
The Show Girl Mask is very striking and mysterious. I especially like the gold crackle which is part of the forehead.
Winners voted on by the public:
1st Place:
 |
| 3 - Dragonfly Mystique by Arlene of Ashpaints |
2nd Place:
 |
| 7 - Showgirl by Jackie of The Pleasant Pheasant |
3rd Place:
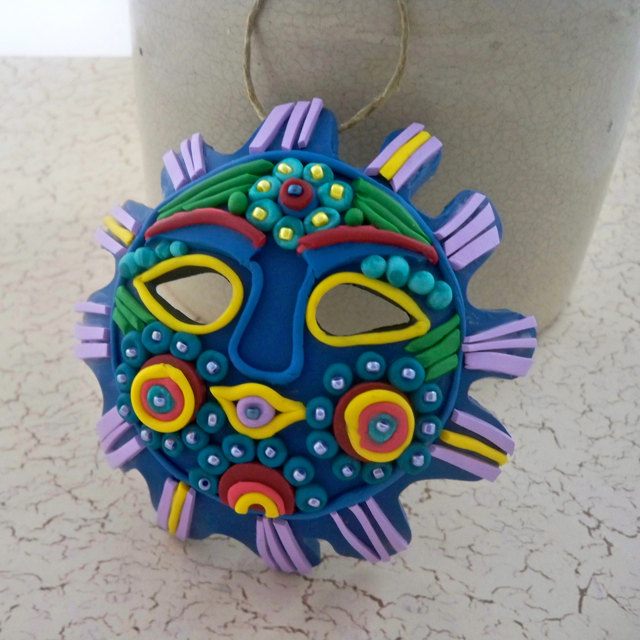 |
| 1 - Mexican Inspired Polymer Clay Mask by Lisa of HiGirls |
Winners voted on by PCAGOE members:
1st Place: |
| 3 - Dragonfly Mystique by Arlene of Ashpaints |
2nd Place:
|
| 7 - Showgirl by Jackie of The Pleasant Pheasant |
3rd Place:
|
| 1 - Mexican Inspired Polymer Clay Mask by Lisa of HiGirls |
The voters who won prizes this month:
Rosa Parks
Sandy Prenzi
Jennifer Smith
Winning voters have one week after being contacted to furnish us with your mailing address. If you do not respond within 1 week, your prize will be forfeited and returned to the prize pool.
Congratulations to all the winners, and thank you to everyone who voted and supports our challenges each month.
193 votes were cast this month.
Comments left by the voters:
A great idea and a great challenge! I love working in polymer but doing faces well takes a lot of skill!
These are so creative. I love how each artist interpreted the theme in a unique way.
A difficult challenge this month. Members can through with flying colors. Very nice.
Very creative stuff - as always. Such talent here in this group!
This was truly a challenge for this artist but I love how it got me to experiment with shapes and dimensions I normally avoid. Everyone did a great job and there are surely seven winners this month!
Adorable masks! Great job by amazing artists.
Even with just seven entries, the choices are still difficult. I went with entries that stretched the boundaries of traditional masks.
Cool masks! I have to say that for me, the Dragonfly Mask takes the cake for being really well done and great looking, but I sure liked the others as a very close second to that one. Good going, everyone.
These are all beautiful works of art . Thanks for sharing
This was a hard decision this month. All the masks are works of art and are all beautiful.
Great variety in the entries this month.
This challenge was particularly difficult for me to vote on as (A) I LOVE masks; and (B) I felt every single one was excellent.
Brava!!!
I love the use of colors and the personal touch in these masks. They are all so nice!
So bummed that I couldn't find time to do this challenge... this was one I was really looking forward to doing, but alas, I haven't even touched a piece of polymer clay in months. :( I really need to get back to creating. Job well done by all who entered. The dragonfly mask is my #1 pick, just beautifully executed...
You guys all did so well! Beautiful work.
A wonderful challenge and awesome entries.
Loved 'em all. Hard to choose.
#7 rocks. Full fledged mask. A lot of professional work went into this one!
All entrees are so different and colorful which made this a difficult decision. I applaud all for their creativity!
Great idea! Love the entries!
Beautiful Masks!
I saw a link to this in a post from Jackie Seiban. These are all amazing masks! I belong to the Polymer Clay Smooshers guild on ArtFire and unfortunately we weren't able to do our Masquerade Ball Challenge this year. You've got some very talented artists here!
-Michelle of CreativeCritters
Love them all....makes it so difficult to choose!
I was impressed by the use of color and rhythm in some of the interpretations this month. Masks aren't easy--I have tried to make them myself and was not completely satisfied with the results, so I appreciate even more the beautiful and striking results in this month's challenge pieces.
Your members are so talented that it is hard to choose!
all the work is lovely and shows off the range of talent in the guild.
I love voting for these monthly
contests! There are so many
talented artists.....
Thanks, Cindi
Your pages continue to inspire me.
Great entries, hard to choose...Always enjoy!
It was hard to make a choice because they are all excellent. I chose the ones that were more "me".
I love seeing the entries every month. All the artists are so original
I love all of them and it was so hard to choose! Can I just pick all 7?!! :)
Being from Mississippi, Mardi Gras is right around the corner. I love these! Great job everyone!
Theresa
I love polymer clay masks, am in Sarajane Halems mask book myslef and oftenmake some - what better medium than PC to express strong feelings like those a mask can represent?
Awesome masks, mostly loved the first one, so vivid
The wakeup Mask is beautiful and I love the symbology.
The thumbnail of #7 was not impressive - enlarged the exquisite detail easily makes it #1.
Nice work everyone!
These are all wonderful! As always,
very hard to choose.
These are fun!
Everyone did so well that as always it was hard to pick. Good luck to everyone.
All the masks are so pretty, it was difficult to chose one. Thanks for letting us help choose.
Just found you and love the site
All the entries are amazing and inspirational.
Love the textures & colors that work so well together
I love the dragon fly on the mask.
I'm sad I missed this one, MOVING takes so much out of you.....
I'm just starting off learning polymer clay and these wonderful works of art are great inspriation for where this new passion might take me. thank you
I think these mask are realy lovely and a piece of art
goodness, so hard to pick,they are so different and original---wonderful work each and evey one-sherry
Just beautiful and I really liked the assortment. Wonderful job to all. Eileen
Such lovely work hard to pick my favorites. Always such enjoyable eye candy displayed at these challenges.
I truly love the crackle finish on the showgirl mask and the braided headband. I like the simplicity of this compared to the more ornate ones.
I am just getting started in poly-clay.
All of these beautiful works inspire me.
Thank you so much for sharing!
In a word....Thanks...Thanks for being here.
Love the colors of the beads on the Mexican mask!
What a lovely group with wonderful goal where polymer clay is so beautifully celebrated through each post.
number 1 is stunning, love the colours and work that must have went into it ! Lovely
All beautiful masks!! What a difficult challenge! The colors of The Mexican Mask are really popping:)
I have not yet joined the PCAGOE but it's on my list ! I love the newsletter I am also a polymer clay artist and it's so much fun to see what other artist's are creating ! I am happy to be able to vote it was fun and inspirational ! Thank You and Good Luck to all the artist's who had entries!
I really love the originality of "Wake Up"!
love the dingly danglies on the wake up mask...looks just like me when I get out of bed!
I simply love the whole contest and how creative people joins to do their very best and show their talent!
Interesting challenge. Loved to see the different styles of work. Particularly liked the color palate used in dragonfly mask as I have always been fasinated by the fancy masks of this type.
All the entries were extremly unique and intricate. It was difficult to judge - the more I looked at the entries, the more I saw to draw my eye towards each one.
Lisa's entry just made me smile and the detail work is exceptional. Well done.
I am glad you gave use the 1-2-3 choice I was having a hard time just picking one.
I thought all entries were quite original; but I could see that a lot of different kinds of work went into the Dragonfly Mask; and it turned out to be gorgeous.
The Show Girl Mask is very striking and mysterious. I especially like the gold crackle which is part of the forehead.
Saturday, October 1, 2011
October Challenge: Masks
Scroll to the bottom of the post to vote for your favorites!

The theme for the October PCAGOE Challenge is Masks. Members could use their imaginations to create anything within this theme as long as the entry contained at least 50% polymer clay.
And the entries are:
Voting form is at the bottom of this post. It may take a minute for it to appear. Click on the titles to see a larger image.
1 - Mexican Inspired Polymer Clay Mask by Lisa of HiGirlsSeveral of the entries are available for sale in our members' store. Please visit the individual shops to see these and other wonderful listings.
"This ornament was inspired by Mexican ceramic sun faces.
Entirely of polymer clay in a slight bowl shape, with seed beads added for a little sparkle."
2 - Moon Mask by Lyndell of Classons Creations
" Inspired by Venetian Masks and Native Moon Masks, this is a representation of what the man on the dark side of the moon would dream about if he could be bathed in sunlight. Golds, bronzes, and colours of the rainbow. His eyes are made from sea glass, a product of the tidal waters he controls. He measures 9-1/2" in diameter and hangs on the wall."
3 - Dragonfly Mystique by Arlene of Ashpaints
"I love texture and this mask is a combination of several layers of texture from the foundation piece that was cut and shaped over a sculpted face mold to the leaf and flower cane slices that edge the mask. Decorative swirls plus a nest of larger leaves and tendrils make a perfect place for this dragonfly to rest for just a minute."
4 -Fantasy Mask by Els of Beadelz
"This mask was made with some left overs from the lasercut workshop with Jana Roberts Benzon. These leftovers had some kind of tribal look which worked great for a mask. The mask is a fantasy creation but with African/tribal and Aztec artefacts in mind. I never ever made anything like a mask or a face. I actually wanted to make a Venetian mask but that turned out completely different."
5 - Venetian Mask by Cindy of Arrowdale Art Studio
"My entry into this month's Challenge of the PCAGOE, Masks, this is my take on a Venetian Ball mask. All of it's clay with an application of Perfect Pearls for shimmer."
6 - Wake Up by Line of Play Sculpt Live
" I call it Wake Up! Her real identity is being taken over by another entity while she is sleeping."
7 - Showgirl by Jackie of The Pleasant Pheasant
"The "Showgirl" Mask is my entry into the October 2011 Polymer Clay Artists Guild of Etsy's Monthly Challenge. This mask is about 3 inches wide by 4 inches tall."
What you could win:

2nd row, L-R: WiredOrchid, MarcymPC,
Voting is closed. Please stop back soon for results.
Subscribe to:
Posts (Atom)